Row Level Security: Strengthening Your App's Data Protection
In an earlier post, we discussed about Multi-Tenancy and more specifically the approach of Column Discriminator. Today we will take a look at how we can achieve that in a simple .Net app by taking advantage of basic dependency injection features and Entity Framework. This approach however should be applicable to most programming languages.
Introduction
First things first, let’s set out what we want to achieve. We are building an app that will host multiple tenants (think of any SaaS product) but to minimize the infrastructure effort we will host everyone in the same DB and the same schema.
This approach introduces a risk, that in case we code something wrong we could potentially allow users from company A to access data from Company B, and we cannot allow that.
Step 1 - Add the Column Discriminator
The first step we have to take is to add a column in the tables that denote to which company/tenant/author this row belongs.
Let’s assume that we have Users, Companies, and Announcements. When we add a new row to the Announcements table we will also add the Company Id so that when we want to extract that info we can say “give me all the announcements that belong to the company with id X”
It might seem straightforward to just add a WHERE clause to each query specifying the company ID. However, I find this approach less than ideal. It can clutter our codebase with redundant snippets and as our organization expands, it increases the likelihood of oversight where a developer might forget to include the necessary WHERE clause. I don’t attribute this to individual developers; rather, I see it as a flaw in our system architecture.
That is why we will use Global Query Filters.
Step 2- Add Global Query Filters
We already have a column in our table that denotes which is the company owner. Instead of using a where clause in all of our queries we can take advantage of Global Query Filters.
In our DbContext, we override the OnModelCreating functions and we add to the entities we are interested in a query filter like this:
modelBuilder.Entity<AnnouncementEntity>().HasQueryFilter(b => EF.Property<string>(a, "tenantId") == tenantId);
Now whenever we use our context to query the AnnouncementEntity it will apply the tenantId filter. But how does it know who is the tenant?
It is time to add our MultiTenantServiceMiddleware.
Step 3 - Add MultiTenantServiceMiddleware
Before we implement this we need to discuss how are we going to make our API Tenant Aware.
When making an API call we need to be able to send the information about the Tenant Id to the API. The easiest and most secure enough approach is to store the id inside a JWT token which is sent with every request.
I prefer this over just an HTTP Header as the JWT is created by our app or our ecosystem which should be signed, thus tampering with it and sending a different id for malicious intent would not be possible. If we would use just an HTTP Header or Query Params that would be too easy to change.
When making the MultiTenantServiceMiddleware the only thing we need to do is grab the token, parse it, and extract the information we need, in this case, the company/tenant id.
We still however did not manage to get the Id from the middleware all the way to the DbContext. Here there are two options. We can use something called Ambtient Context or we can rely on our trusty DI and Scope system.
Let’s take a look at both.
Step 4 - Ambient Context or Service
AsyncLocal
Using the Ambient Context, it is essentially a Service that has a scoped lifetime and we can inject it wherever we need it. We use the AsyncLocal in order to store that info and we add some simple functions such as SetTenantId which we would then use inside our middleware to set the TenantId and grab it using the public property whenever we need it.
public static class TenantExecutionContext
{
    private static AsyncLocal<string> tenantId = new AsyncLocal<string>();

    private static string? Tenantid => tenantId.Value;

    public static void SetTenantId(string value)
    {
        if (value == null)
        {
            throw new InvalidOperationException("Tried to set an empty Tenant");
        }

        var currentTenantId = tenantId.Value;

        if (currentTenantId == null || string.Equals(tenantId.Value, value, StringComparison.InvariantCulture))
        {
            tenantId.Value = value;

            return;
        }

        throw new InvalidOperationException($"Tried to assign the Tenant to {value}, but it is already set to {TenantId}");
    }
}
Personally, I do not feel confident enough to use AsyncLocal - it is perfectly fine from the .Net side however I luck information on how it is used and that is why I decided to go with a simple ITenant Service.
ITenant Service
We need to remember here a few things to understand why having a service storing the id will actually work.
This is a tricky/advanced question I ask during my interviews. “What is the default lifetime of the DbContext?”
The answer is Scoped which means that it lives for the lifetime of our request. Similarly if we set the ITenant Service to be scoped, then any info inside it will remain for as long as the request lives, thus isolating the scope for each request and being sure that anyone who uses the ITenant Service will only target that id.
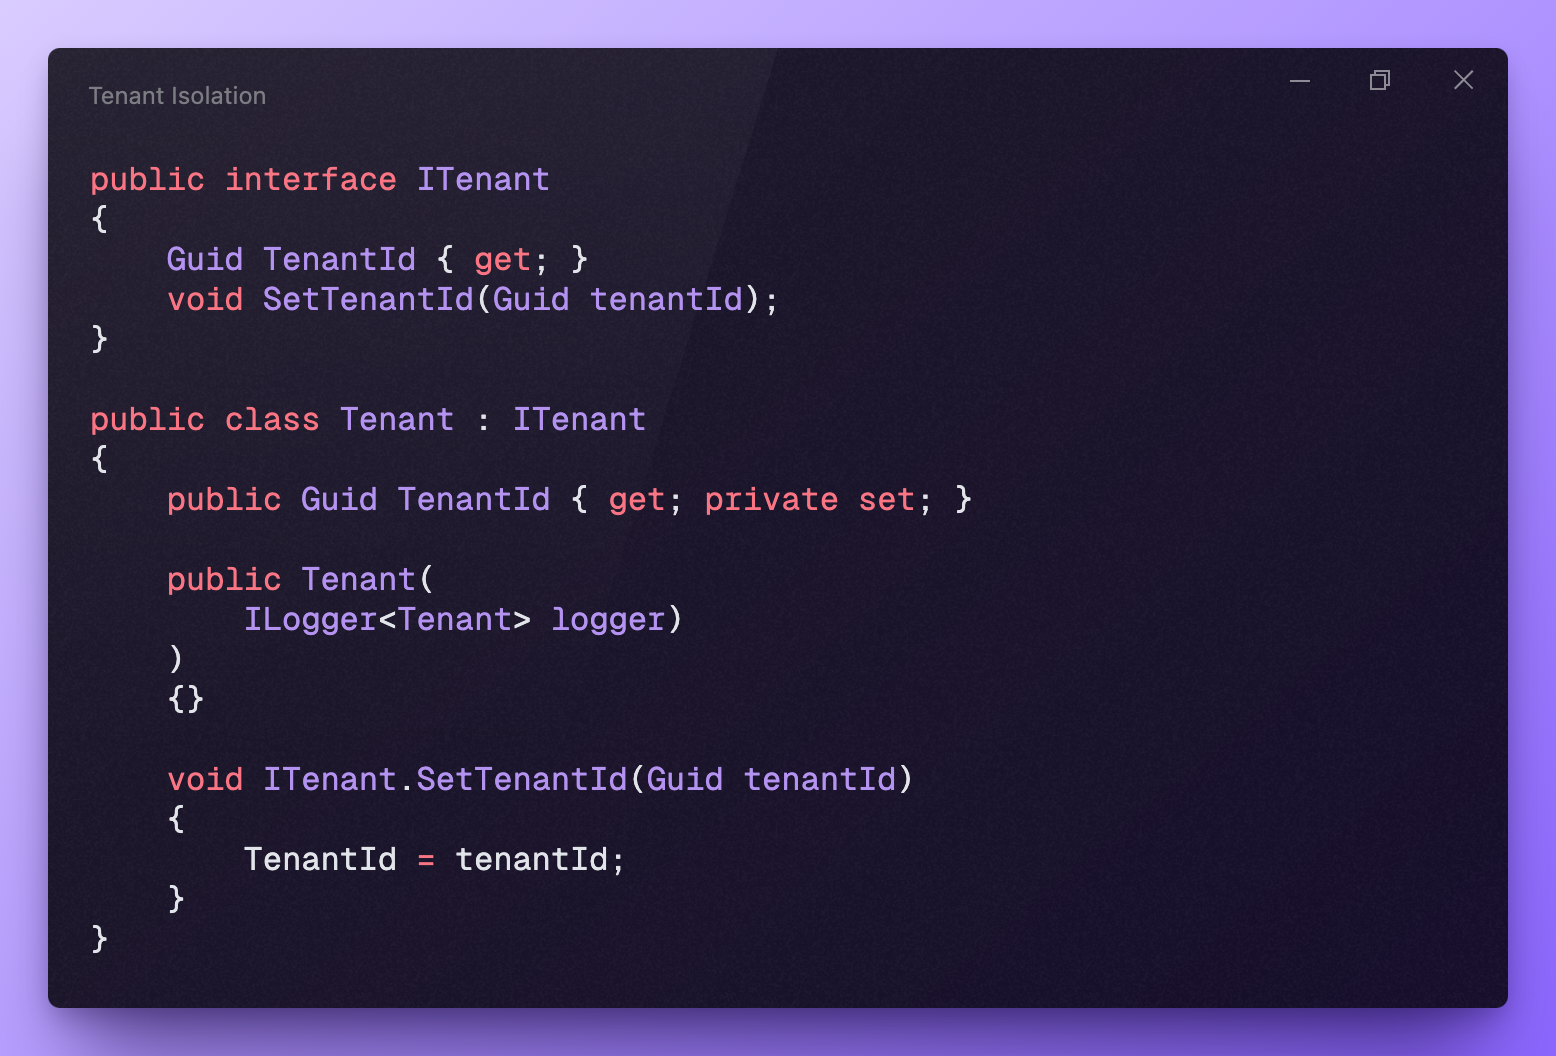
The ITenant is very simple, just a property to hold the value and a setter, very similar to the Ambient Context.
public interface ITenant
{
    Guid TenantId { get; }
    void SetTenantId(Guid tenantId);
}

public class Tenant : ITenant
{
    public Guid TenantId { get; private set; }

    public Tenant(
        ILogger<Tenant> logger)
    )
    {}

    void ITenant.SetTenantId(Guid tenantId)
    {
        TenantId = tenantId;
    }
}
However, I want to explicitly mention that I on purpose did not add the suffix Service to this class. For me in the majority of cases, services should be transient. They should not hold any state and here we want it to actually hold a state. That is why I omit the Service so that if someone reads this class can maybe spot that it won’t behave in the same way as other services even though it looks like one.
Step 5 - Make all these work together.
What we need to do now is take all these different components and make them work nicely together.
We should inject our middleware with our ITeannt and adapt our code to use SetTenantId.
We should then also inject our DbContext with the ITenant so that when we use the query filter we can grab the id.
And of course, we should add our Middleware in our request pipeline so that it can populate the tenant!
Step 6 - (Optional) Auto-set the tenant Id during Update/Insert
The whole point of this article is to reduce potential errors and to make the developers’ life easier by abstracting the multi-tenant approach from their eyes. I do not want the devs to have to think about which tenant it is now etc. For them, it should be just a simple query.
There is one last thing we could do, to improve further on this. That is to automatically add the tenant id to the entities we want to without having to work with our models/entities and keep sending the id from the controller to each service.
For this, we need to do a bit more advanced DbContext Foo.
Firstly, I created a new base Entity type, the TenantAwareEntity. This is just an abstraction layer that allows me to mark any entity I want as tenant aware just by using inheritance, removing duplicate code and potential hiccups but also allowing me to filter the entities using this when needed.
public class TenantAwareEntity
{
    [ForeignKey(nameof(Tenant))]
    public Guid TenantId { get; set; }
    public TenantEntity? Tenant { get; set; }
}
Now in our DbContext, we need to hijack the save process. This might sound daunting but it is quite straightforward. We will override the SaveChanges function and for each entity saved we will set the value of TenantId.
I here update the TenantId in both cases of Add or Update to ensure no one has tampered with the data by accident or on purpose.
As we are still in our trusty DbContext we take advantage of the ITenant same as we did in the query filter, ensuring the same results.
public ApplicationDbContext(
    IRequestTenant requestTenant,
    DbContextOptions<ApplicationDbContext> options,
    TimeProvider dateTimeProvider) :
    base(options)
{
    _requestTenant = requestTenant ?? throw new ArgumentNullException(nameof(requestTenant));
    _dateTimeProvider = dateTimeProvider ?? throw new ArgumentNullException(nameof(dateTimeProvider));
}

private void ConfigureRLSForEntities(ModelBuilder builder)
{
    builder.Entity<AnnouncementEntity>(entity =>
    {
        entity.HasQueryFilter(e => e.TenantId == _requestTenant.TenantId);
    });
}

public override Task<int> SaveChangesAsync(CancellationToken cancellationToken = new CancellationToken())
{
    UpdateStatuses();
    return base.SaveChangesAsync(cancellationToken);
}
public override int SaveChanges()
{
    UpdateStatuses();
    return base.SaveChanges();
}
    private void UpdateStatuses()
{
    foreach (var entry in ChangeTracker.Entries<TenantAwareEntity>())
    {
        switch (entry.State)
        {
            case EntityState.Added:
                entry.Entity.TenantId = _requestTenant.TenantId;
               break;

           case EntityState.Modified:
               entry.Entity.TenantId = _requestTenant.TenantId;
               break;
       }
   }
Now we do not need to care about setting any TenantId during our services, mappers etc.
That’s all folks!
You maybe have noticed that we did not use anything outside of EntityFramework. We did not rely on Postgres to use RLS or any other mechanism, thus we do not have any DB policies to enforce it.
If you would like to do so and use RLS on the DB as another layer of security, during your migration you would need to write the appropriate SQL to secure your tables.
I will be writing a post on how to achieve what we did today but in NestJS and in that article I will be relying on Postgres, so if you are interested subscribe to not miss it 😊